This tutorial goes through the process of creating a Blogger template. Although these steps are catered towards creating a specific theme, the lessons in this tutorial can be used to create a wide variety of templates. Have fun getting creative with your own blog!

Create a new document in Photoshop using these settings. Width 1440px, Height 720px, Resolution 72 pixels/inch. Start with a transparent background.

Creating an appealing background is key to a great looking blog template. For this template we will use 3 layers for the background. First, select the foreground color by double-clicking on the foreground color box. The Color Picker Pane will pop up allowing you select black. Now select the Paint Bucket Tool located in the Tool Panel and fill your new document with black paint.
![]()

Create a new layer by clicking on the second icon from the right in the bottom of the layers panel.
![]()
We are going to add a gradient to this layer. Right click on the paint bucket tool in the Tool Panel and switch to the Gradient Tool. In the Gradient Tool Bar select Black, White and Linear Gradient.
![]()

Zoom out (Ctrl+-) to 50% and maximize your document. To apply the gradient, click below the image and drag upward beyond the top of the image. Hold the Shift key down as you do this to make the gradient straight.
 Now make sure the gradient layer is highlighted and change the opacity to 43%. The highlighted layer will be blue in the layers panel. The Opacity slider is in the top right of the layers panel.

Lowering the opacity of the gradient layer will allow the black layer to show through softening the gradient. Your document should now look like this.

Now we are going to take a picture of a football and use this as a background image. I chose an image for my background that has a large file size. By doing this, I will not have to enlarge the picture causing it to pixelate and can instead maintain the original picture quality. This image is 1800px x 1174px.

Open the image as a new document and extract the football from its background. There are many selection tools that can be used for extracting items. In this case, I used the Magnetic Lasso. This tool works well for this example because there is a big contrast between the football and the background in most of the image. You can find this tool in the Tool Panel by right clicking on the lasso tool.

Click around the football until the football is selected. You can tell the football is selected because it will have alternating black and white dashes around the outside.

Right click on the image and choose Select Inverse. The dashes will now be around the white background.

Press Delete. Only your football should remain. At this point you can touch up the edges if necessary with the eraser or paint tools. Now highlight the football by drawing a Rectangular Marquee around it and copying it Ctrl+C.

Create a new layer in your original document and paste the football in it Ctrl+P. If your image is too big or too small you can transform it by pressing Ctrl+T. Position the football in the middle of the document and change the opacity of this layer to 21%. Your image should now look like this. Your background is complete.

To add the smaller images to this template we need to place Guides on our document. Guides are temporary lines you can use to line objects up in Photoshop. Your document will be more visually appealing if objects on the template are exactly lined up. To add guides we should first make sure rulers are visible across the top and down the side of our document. Go to View in the File menu and make sure there is a check next to Rulers. If rulers are present you can click on the ruler and drag a guide to where you need it to go. If you would like to be more precise about placing your guides go to View>New Guide and specify where you would like the guide to be. If you select View>Snap To>Guides, when you place object close to the guides Photoshop will automatically line the object up with the guide for you. For this example I placed guides horizontally at 1.15in, 3.15in, 5.15in, and 7.15in, and vertically at 2.5in and 17.5in.

Now we are going to add four small images down both sides of our template. Depending on the type of blog you are trying to create, you can use images such as family pictures, product images, etc. Since this is a football blog, I will be using football pictures. I found these images online by doing an image search on Google. Google is a good place to find images, but be careful not to use images that are copyrighted unless you have permission.
For this layout I will need eight pictures. Find the images you want to use and open them in Photoshop. Use the Rectangular Marquee Tool to draw a square around the portion of the image you want to use. Hold the Shift key down as you draw your square to make sure your marquee is a square instead of rectangular.

Press Ctrl+C to copy the selected portion of the image. Open a new document in Photoshop and press Ctrl+V to paste the selected image into the new document. You will notice that when you open a new document in Photoshop after copying an image, Photoshop automatically changes the size of the new document to match the size of the copied material so you don’t have to worry about sizing issues.
Go to Images>Image Size. We want to standardize the size of these images. Make sure Constrain Proportions is selected and enter the width as 121 pixels.

Use the rectangular marquee tool again to select the image. Click on your template and press Ctrl+V to paste your image. Photoshop will automatically put this image into a new layer. Position your image up against the guide lines as shown and repeat this process until all eight images have been added to your document.

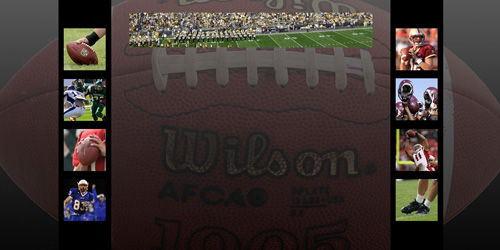
Hide the guides when you are done using them. Do this by going to View>Clear Guides. Your document should now look like this.

We are going to frame the images on each side of the template with a black border. To do this we will create a black rectangle behind the images. Since we want the images to be visible on top of the new shape, we need to create a new layer below the image layers. In the Layers Panel, click on the large football background image. Add a new layer and select this new layer. Use the rectangular marquee tool to draw a rectangle. Use the arrow keys on your keyboard to center the rectangle around the images. Select the Paint Bucket Tool from the Tool Menu and fill the area in the marquee with black.

Right click on the layer with the black rectangle in the Layers Panel and choose Duplicate Layer. Use the Move Tool to move the new rectangle behind the second set of images.

The last step for creating our template is to find an image to use as the header background. Again find a large image and use the rectangular marquee tool to select a portion of the image. In the Marquee options menu select Fixed Size next to Style and set the size to Width: 700px, Height: 105px.
![]()
Copy the selected image and paste it into the template in the middle towards the top. Your template design is now complete.

Continue with the second portion of this tutorial to learn how to use your new template for a Blogspot.com or Blogger.com blog.