How to Create a Blogger Template Using Adobe Photoshop – Part 2

This tutorial is the second part of a two-part tutorial on creating a Blogger template.  The first tutorial covered how to design a template in Adobe Photoshop.  This tutorial covers how to implement your new Blogger template.

Photoshop Blogger Template Creation Tutorial

Open your template design in Photoshop.   Hide the header image by clicking on the eye next to the header image layer in the Layers Panel.

Photoshop Layer Visibility Tool

You are left with the background image for your blog.  Go to File>Save for Web & Devices.  Choose JPEG for the file type and Very High for the quality.  Click Save to save this image on your computer.

Photoshop Save For Web

Now you need to save the header image as its own file.  Turn the visibility of this layer back on.  Make sure the header layer is selected, draw a rectangular marquee around the header image and press Ctrl+C to copy this image.  Open a new document in Photoshop and paste the image in the new document.  Save this image for web or device just as you saved the background image.

You will need to find a place to host your images online.  I use Photobucket.com because it is free to create an account and upload images.  After you have created an account with Photobucket.com select Reduce to: 1 megabyte file size and click Choose files.

Photobucket Choosing File

You can browse to where your background and header images are saved on your computer.  Select these files and click Open to upload them to Photobucket.  You will now see these images in your Photobucket photo gallery.

Photobucket Image Gallery

Sign In to your Blogger account and select the blog you would like to change.   Select the Layout tab and choose Pick New Template.   Select the Minima template and click Save Template.

Blogger Template Chooser

Now click Edit HTML under the Layout tab.  We will be changing some HTML code.  If you make a mistake during this process just reselect the Minima template to restore the template to this point.  It is a good idea to save changes to your template as you go through these steps.  Pull up your blog in another browser and refresh it F5 each time you save your template so you can see the changes you make.

Press Ctrl+F on your keyboard to pull up the Find window.  Type the word body and press Enter twice. The second “body” in the document should be the body tag which looks like this:

body {
background:$bgcolor;
margin:0;
color:$textcolor;
font:x-small Georgia Serif;
font-size/* */:/**/small;
font-size: /**/small;
text-align: center;
}

Change the code to look like this:

body {
background:$bgcolor;
background-image: url(‘the address for this image’);
background-position: center;
background-repeat: no-repeat;
background-attachment: fixed;
margin:0;
color:$textcolor;
font:x-small Georgia Serif;
font-size/* */:/**/small;
font-size: /**/small;
text-align: center;
}

You will find the address for the background image by hovering over the image in Photobucket.  Click in the field next to Direct Link and press Ctrl+C to copy the address.  You can then paste the code for the address where it goes in the HTML.

Photobucket Direct Link Image Use

Now add the image for the header in the header-wrapper.  Your code should look like this.

#header-wrapper {
width:660px;
margin:0 auto 10px;
border:1px solid #000000;
background-image: url(‘/the address for this image’);
background-position: center;
background-repeat: no-repeat;
}

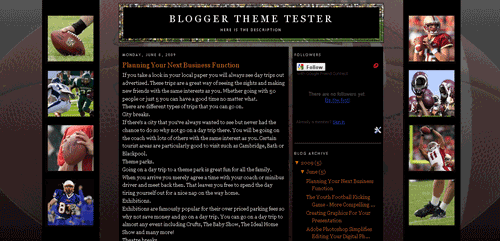
Your blog should now look like this:

bth-stage1

In the next step you are going to add backgrounds to the text.   Toward the top of the HTML code there is a section called  /* Variable definitions.  Inside this section is where all the fonts and colors in the blog are controlled.  Here is an example of the code you will find:

<Variable name=”bgcolor” description=”Page Background Color”
type=”color” default=”#fff” value=”#ffffff”>

This code tells you that the Page Background Color is being defined here.  This variable may also be used to define other items on the page that are the same color.  These will all be shown in the code as $bgcolor. The value is a # followed by a color code.  We are going to change the fs to zeros.

<Variable name=”bgcolor” description=”Page Background Color”
type=”color” default=”#000″ value=”#000000″>

Changing this code changes the background color from white to black.  Now we are going to add the code background:$bgcolor; to four tags:
#header h1
#header .description
#main-wrapper
#sidebar-wrapper

An example of adding this code is shown below:

#header h1 {
margin:5px 5px 0;
padding:15px 20px .25em;
line-height:1.2em;
text-transform:uppercase;
letter-spacing:.2em;
font: $pagetitlefont;
background:$bgcolor;
}

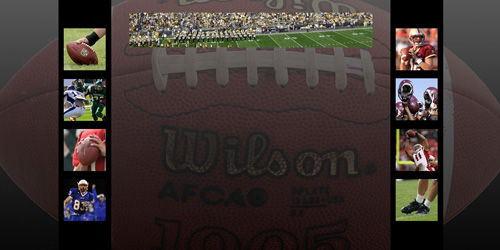
This is how your template should look at this point.

Blogger Template Installation

You can make additional changes to your blog template if you desire by adjusting the colors in the variable section, or adjusting the HTML code further if you know how.   You can find the color for a particular color at the bottom of the Photoshop Color Picker Palette.

Photoshop Color Picker

In addition to the changes covered in this tutorial, for this template I added padding to the sides of the sidebar and main sections and made additional color changes to the text.  This is the final template.

Blogger Installed Template Photoshop Tutorial

Adobe Photoshop CS3 Default Keyboard Shortcuts

Adobe® Photoshop® CS3 Keyboard Shortcuts

The following keyboard shortcuts are the defaults for Adobe Photoshop CS3 for Microsoft Windows XP.  For Mac users, substitute the Command key for Ctrl and the Option key for Alt. This list was obtained by going to Edit->Keyboard Shortcuts, and then clicking on the Summarize… button to save the shortcuts in an html file.  Adobe automatically generated shortcut summary file includes all available commands, including those that don’t have shortcuts by default.  All commands that don’t have have shortcuts have been removed from this list. Adobe also provides a list of the default keyboard shortcuts from the Help menu.

Application Menus

Command Shortcut
File
New… Ctrl+N
Open… Ctrl+O
Browse… Alt+Ctrl+O
Shift+Ctrl+O
Open As… Alt+Shift+Ctrl+O
Close Ctrl+W
Close All Alt+Ctrl+W
Close and Go To Bridge… Shift+Ctrl+W
Save Ctrl+S
Save As… Shift+Ctrl+S
Alt+Ctrl+S
Save for Web & Devices… Alt+Shift+Ctrl+S
File Info… Alt+Shift+Ctrl+I
Page Setup… Shift+Ctrl+P
Print… Ctrl+P
Print One Copy Alt+Shift+Ctrl+P
Exit Ctrl+Q
Edit
Undo/Redo Ctrl+Z
Step Forward Shift+Ctrl+Z
Step Backward Alt+Ctrl+Z
Fade… Shift+Ctrl+F
Cut Ctrl+X
F2
Copy Ctrl+C
F3
Copy Merged Shift+Ctrl+C
Paste Ctrl+V
F4
Paste Into Shift+Ctrl+V
Fill… Shift+F5
Free Transform Ctrl+T
Transform>
Again Shift+Ctrl+T
Color Settings… Shift+Ctrl+K
Keyboard Shortcuts… Alt+Shift+Ctrl+K
Menus… Alt+Shift+Ctrl+M
Preferences>
General… Ctrl+K
Image
Adjustments>
Levels… Ctrl+L
Auto Levels Shift+Ctrl+L
Auto Contrast Alt+Shift+Ctrl+L
Auto Color Shift+Ctrl+B
Curves… Ctrl+M
Color Balance… Ctrl+B
Black & White… Alt+Shift+Ctrl+B
Hue/Saturation… Ctrl+U
Desaturate Shift+Ctrl+U
Invert Ctrl+I
Image Size… Alt+Ctrl+I
Canvas Size… Alt+Ctrl+C
Layer
New>
Layer… Shift+Ctrl+N
Layer via Copy Ctrl+J
Layer via Cut Shift+Ctrl+J
Create/Release Clipping Mask Alt+Ctrl+G
Group Layers Ctrl+G
Ungroup Layers Shift+Ctrl+G
Arrange>
Bring to Front Shift+Ctrl+]
Bring Forward Ctrl+]
Send Backward Ctrl+[
Send to Back Shift+Ctrl+[
Merge Layers Ctrl+E
Merge Visible Shift+Ctrl+E
Select
All Ctrl+A
Deselect Ctrl+D
Reselect Shift+Ctrl+D
Inverse Shift+Ctrl+I
Shift+F7
All Layers Alt+Ctrl+A
Refine Edge… Alt+Ctrl+R
Modify>
Feather… Alt+Ctrl+D
Shift+F6
Filter
Last Filter Ctrl+F
Extract… Alt+Ctrl+X
Filter Gallery…
Liquify… Shift+Ctrl+X
Pattern Maker… Alt+Shift+Ctrl+X
Vanishing Point… Alt+Ctrl+V
Analysis
Record Measurements Shift+Ctrl+M
View
Proof Colors Ctrl+Y
Gamut Warning Shift+Ctrl+Y
Zoom In Ctrl++
Ctrl+=
Zoom Out Ctrl+-
Fit on Screen Ctrl+0
Actual Pixels Alt+Ctrl+0
Extras Ctrl+H
Show>
Target Path Shift+Ctrl+H
Grid Ctrl+’
Guides Ctrl+;
Rulers Ctrl+R
Snap Shift+Ctrl+;
Lock Guides Alt+Ctrl+;
Window
Actions Alt+F9
F9
Brushes F5
Color F6
Info F8
Layers F7
Help
Photoshop Help F1

Palette Menus

Command Shortcut
History
Step Forward Shift+Ctrl+Z
Step Backward Alt+Ctrl+Z
Layers
New Layer… Shift+Ctrl+N
Create/Release Clipping Mask Alt+Ctrl+G
Merge Layers Ctrl+E
Merge Visible Shift+Ctrl+E
Measurement Log
Record Measurements Shift+Ctrl+M

Tools

Tools Shortcut
Move Tool V
Rectangular Marquee Tool M
Elliptical Marquee Tool M
Lasso Tool L
Polygonal Lasso Tool L
Magnetic Lasso Tool L
Quick Selection Tool W
Magic Wand Tool W
Crop Tool C
Slice Tool K
Slice Select Tool K
Spot Healing Brush Tool J
Healing Brush Tool J
Patch Tool J
Red Eye Tool J
Brush Tool B
Pencil Tool B
Color Replacement Tool B
Clone Stamp Tool S
Pattern Stamp Tool S
History Brush Tool Y
Art History Brush Tool Y
Eraser Tool E
Background Eraser Tool E
Magic Eraser Tool E
Gradient Tool G
Paint Bucket Tool G
Blur Tool R
Sharpen Tool R
Smudge Tool R
Dodge Tool O
Burn Tool O
Sponge Tool O
Pen Tool P
Freeform Pen Tool P
Horizontal Type Tool T
Vertical Type Tool T
Horizontal Type Mask Tool T
Vertical Type Mask Tool T
Path Selection Tool A
Direct Selection Tool A
Rectangle Tool U
Rounded Rectangle Tool U
Ellipse Tool U
Polygon Tool U
Line Tool U
Custom Shape Tool U
Notes Tool N
Audio Annotation Tool N
Eyedropper Tool I
Color Sampler Tool I
Ruler Tool I
Count Tool I
Hand Tool H
Zoom Tool Z
Default Foreground/Background Colors D
Switch Foreground/Background Colors X
Toggle Standard/Quick Mask Modes Q
Toggle Screen Modes F
Toggle Preserve Transparency /
Decrease Brush Size [
Increase Brush Size ]
Decrease Brush Hardness {
Increase Brush Hardness }
Previous Brush ,
Next Brush .
First Brush <
Last Brush >

Tutorial – How to Create a Blogger Template Using Adobe Photoshop – Part 1

This tutorial goes through the process of creating a Blogger template.  Although these steps are catered towards creating a specific theme, the lessons in this tutorial can be used to create a wide variety of templates.  Have fun getting creative with your own blog!

Football Theme Blogger Template Tutorial

Create a new document in Photoshop using these settings.  Width 1440px, Height 720px, Resolution 72 pixels/inch.  Start with a transparent background.

Photoshop Create New Document Football Theme Tutorial

Creating an appealing background is key to a great looking blog template.  For this template we will use 3 layers for the background.  First, select the foreground color by double-clicking on the foreground color box.  The Color Picker Pane will pop up allowing you select black.  Now select the Paint Bucket Tool located in the Tool Panel and fill your new document with black paint.

Photoshop Foreground Color Picker

Photoshop Color Picker Tutorial

Create a new layer by clicking on the second icon from the right in the bottom of the layers panel.

Photoshop Create New Layer Tutorial

We are going to add a gradient to this layer.   Right click on the paint bucket tool in the Tool Panel and switch to the Gradient Tool.  In the Gradient Tool Bar select Black, White and Linear Gradient.

Photoshop Paint Bucket Tool

Photoshop Gradient Selection Tool

Zoom out (Ctrl+-) to 50% and maximize your document.  To apply the gradient, click below the image and drag upward beyond the top of the image.  Hold the Shift key down as you do this to make the gradient straight.

Photoshop Gradient ToolNow make sure the gradient layer is highlighted and change the opacity to 43%.  The highlighted layer will be blue in the layers panel.  The Opacity slider is in the top right of the layers panel.

Photoshop Opacity Tool

Lowering the opacity of the gradient layer will allow the black layer to show through softening the gradient.  Your document should now look like this.

Photoshop Background Layer

Now we are going to take a picture of a football and use this as a background image.  I chose an image for my background that has a large file size.  By doing this, I will not have to enlarge the picture causing it to pixelate and can instead maintain the original picture quality.  This image is 1800px x 1174px.

Photoshop Football Image Manipulation

Open the image as a new document and extract the football from its background.  There are many selection tools that can be used for extracting items.  In this case, I used the Magnetic Lasso.  This tool works well for this example because there is a big contrast between the football and the background in most of the image.  You can find this tool in the Tool Panel by right clicking on the lasso tool.

Photoshop Magnetic Lasso Tool

Click around the football until the football is selected.  You can tell the football is selected because it will have alternating black and white dashes around the outside.

Photoshop Magnetic Lasso Edit Football

Right click on the image and choose Select Inverse.  The dashes will now be around the white background.

Photoshop Select Inverse Tutorial Football

Press Delete.  Only your football should remain.  At this point you can touch up the edges if necessary with the eraser or paint tools.  Now highlight the football by drawing a Rectangular Marquee around it and copying it Ctrl+C.

Photoshop Football Edit Remove Background

Create a new layer in your original document and paste the football in it Ctrl+P.  If your image is too big or too small you can transform it by pressing Ctrl+T.  Position the football in the middle of the document and change the opacity of this layer to 21%.  Your image should now look like this.  Your background is complete.

Photoshop Football Background Blogger Template

To add the smaller images to this template we need to place Guides on our document.  Guides are temporary lines you can use to line objects up in Photoshop.  Your document will be more visually appealing if objects on the template are exactly lined up.  To add guides we should first make sure rulers are visible across the top and down the side of our document.  Go to View in the File menu and make sure there is a check next to Rulers.  If rulers are present you can click on the ruler and drag a guide to where you need it to go.  If you would like to be more precise about placing your guides go to View>New Guide and specify where you would like the guide to be.  If you select View>Snap To>Guides, when you place object close to the guides Photoshop will automatically line the object up with the guide for you.  For this example I placed guides horizontally at 1.15in, 3.15in, 5.15in, and 7.15in, and vertically at 2.5in and 17.5in.

Photoshop Horizontal Guide

Now we are going to add four small images down both sides of our template.  Depending on the type of blog you are trying to create, you can use images such as family pictures, product images, etc.  Since this is a football blog, I will be using football pictures.  I found these images online by doing an image search on Google.  Google is a good place to find images, but be careful not to use images that are copyrighted unless you have permission.

For this layout I will need eight pictures.    Find the images you want to use and open them in Photoshop. Use the Rectangular Marquee Tool to draw a square around the portion of the image you want to use.  Hold the Shift key down as you draw your square to make sure your marquee is a square instead of rectangular.

Photoshop Image Edit Football Template

Press Ctrl+C to copy the selected portion of the image.  Open a new document in Photoshop and press Ctrl+V to paste the selected image into the new document.  You will notice that when you open a new document in Photoshop after copying an image, Photoshop automatically changes the size of the new document to match the size of the copied material so you don’t have to worry about sizing issues.

Go to Images>Image Size.  We want to standardize the size of these images.  Make sure Constrain Proportions is selected and enter the width as 121 pixels.

Photoshop Image Resize Tool

Use the rectangular marquee tool again to select the image.  Click on your template and press Ctrl+V to paste your image.  Photoshop will automatically put this image into a new layer.  Position your image up against the guide lines as shown and repeat this process until all eight images have been added to your document.

photoshop-place-images-tool-tutorial

Hide the guides when you are done using them.  Do this by going to View>Clear Guides.  Your document should now look like this.

Photoshop Blogger Template Tutorial Images

We are going to frame the images on each side of the template with a black border.  To do this we will create a black rectangle behind the images.  Since we want the images to be visible on top of the new shape, we need to create a new layer below the image layers.  In the Layers Panel, click on the large football background image.   Add a new layer and select this new layer.  Use the rectangular marquee tool to draw a rectangle.  Use the arrow keys on your keyboard to center the rectangle around the images. Select the Paint Bucket Tool from the Tool Menu and fill the area in the marquee with black.

Photoshop Template Images Placement

Right click on the layer with the black rectangle in the Layers Panel and choose Duplicate Layer.  Use the Move Tool to move the new rectangle behind the second set of images.

Photoshop Duplicate Layer

The last step for creating our template is to find an image to use as the header background.  Again find a large image and use the rectangular marquee tool to select a portion of the image.  In the Marquee options menu select Fixed Size next to Style and set the size to Width: 700px, Height: 105px.

Photoshop Image Size Toolbar

Copy the selected image and paste it into the template in the middle towards the top.  Your template design is now complete.

Photoshop Football Custom Template Design

Continue with the second portion of this tutorial to learn how to use your new template for a Blogspot.com or Blogger.com blog.